Part 1: Windows 10 Technical Preview Installment Requirement:
Processor: 1 gigahertz (GHz) or faster
RAM: 1 gigabyte (GB) (32-bit) or 2 GB (64-bit)
Free hard disk space: 16 GB
Graphics card: Microsoft DirectX 9 graphics device with WDDM driver
Others: A Microsoft account and Internet access
Part 2: What’s to Be Done Before The Installation?
1. Backup your entire system.
This will help you get back to your previous system in case of failing to install Windows 10 Technical Preview. So don’t forget to do this.
2. Backup your data.
If you don’t want to risk losing your data in your computer you’d better to make a copy of your important data on a removed disk or another spare PC.
3. Ensure you have access to the drivers and applications you need.
Drivers for basic functions like storage, networking, input, and display come with Windows. These drivers allow you to complete the Windows installation and connect to the Internet. Thus it is essential to backup the drivers. Some applications you use most like Microsoft office is also important. So bear in mind to keep offline installers for these applications.
Part 3: How to Install Windows 10 Technical Preview:
Considering the safety of your computer I introduce a better option to install the OS-running it on a virtual machine that won't affect your system in any way (except for occupying some space on the hard drive). Let’s go over it step by step:
Step 1: Download ISO of the Technical Preview Preview from Microsoft website. Please choose the appropriate version (32 bit or 64 bit) according to your computer. There is one thing you must to do after downloading it-checking the ISO integrity. You can perform it by using the Microsoft File Checksum Integrity verifier if your computer runs on Windows.
Step 2: Download and install Oracle VM VirtualBox
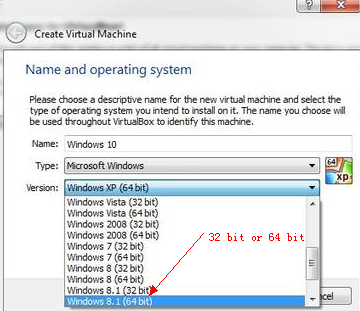
Step 3: Run Virtual Box, then click the “New” icon. In the Create Virtual Machine dialog box, type "Windows 10," then click the version selector and choose Windows 8.1 (making sure to match the ISO you downloaded: 32- or 64-bit). Then click “Next”
Step 4: A window like below will come up. Follow the instruction in the window and continue.
Step 5: Then select "Create a virtual hard drive" and click Create. Accept VDI (VirtualBox Disk Image) as the file type for the drive, and then choose an appropriate size for the virtual drive. Finally, click Create, then VirtualBox will build your virtual drive.
Step 6: After the process completes, click the Start button in the VirtualBox toolbar. You'll see a box guide you to "Select start-up disk." Click the little file folder next to the pull-down, then navigate to the Windows 10 ISO file you downloaded in Step 1. Then click Start.
Step 7: Choose the "Custom: Install Windows only (advanced)" option when it presents itself. As usual, the setup process may involve a few reboots.
After finishing all the steps above you’re supposed to start Windows 10 on your computer. Just go to explore the new features you have interest in.


